
Creating a Simple Skeletal Animation
-
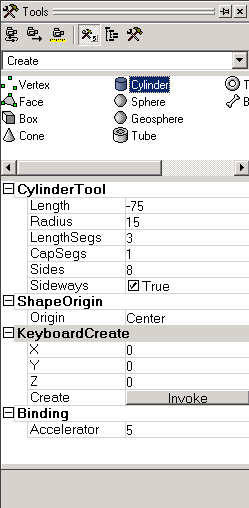
Select "Create/Cylinder" in the Tools pane.
-
In the Properties pane, select "LengthSegs" and change the value to 3 and the "Sideways" property to true.
-
In the workspace, right click one of the views to give it the focus. Go to the toolbar
and select the "Front View".

-
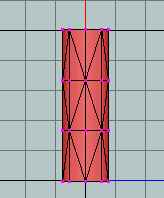
Now click the left mouse button and drag the mouse down about 5 grid cells.
This will create a cylinder with 3 stacks.
-
Select "Create/Bone" in the Tools pane.
-
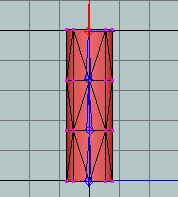
In the same view where you created the cylinder, click once on each stack of
vertices starting with the bottom. This will create 4 bones in a chain. You will need to disable snap to grid
in the toolbar in order to place the bones between grid lines.

-
From the menu select "Bone/Auto Assign Vertices...". The default settings for this dialog should assign all
vertices to the nearest bone so just click OK.

-
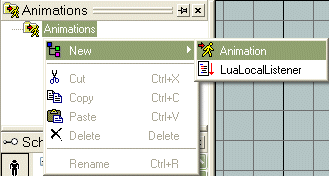
Now that we have the vertices assigned to the skeleton it's time to animate. Go to
the 'Animations' pane, right click on 'Animations' and select 'New/Animation' in
the context menu.
-
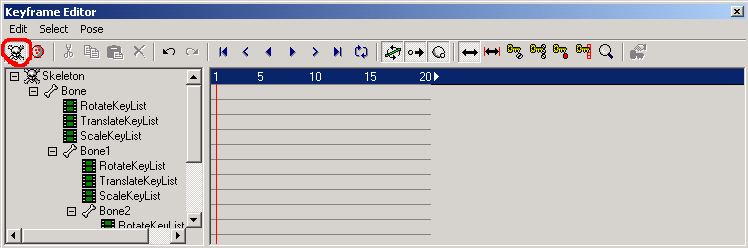
Open the keyframe editor by double clicking the animation object or in the main menu select
"Windows/Keyframe Editor...". For versions 0.9.0 and later make sure you're in skeletal animation mode. The skull and crossbones should be
depressed and you should see the skeleton and bones in the pane on the left side of the keyframe editor.
-
Click the 'Create frame' button
 and left click any row in the first and last frame to create keys on all the bones for those frames. Note that
left clicking in the header will always set the current frame of animation, right clicking will
always select keys and right clicking in the header will select entire frames.
and left click any row in the first and last frame to create keys on all the bones for those frames. Note that
left clicking in the header will always set the current frame of animation, right clicking will
always select keys and right clicking in the header will select entire frames.
When animating there are 3 things you must do
- Set the current frame
- Select the appropriate animation tool
- Select the bone(s) you will be animating (for vertex animation you would select vertices
instead of bones)
Having said that, let's get to the fun stuff.
-
The first key on each bone defines the initial pose of the character for the selected animation. In our case that
can stay as is so we don't need to change that frame. And since we want a nice looping animation the last frame
should match the first frame which it already does, so let's change something in between and see what happens.
In the animation controls (bottom of the fragMOTION window), grab the frame slider and drag it to the middle
(you can also do this in the grid header). The current frame should
show a 10, you will also see the red line move in the keyframe editor.
-
In the 'Tools' pane select 'Skeletal Animation/Rotate Key'. This is the tool we will use to bend the cylinder using
rotation keys. This, like all animation tools, creates keys at the current frame.
-
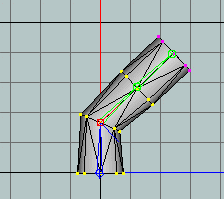
In the 'Skeleton' pane select 'Bone1'. This is the bone on which the Rotate Key tool will create the rotation key.
-
In the view showing the cylinder, click the left mouse button and drag the mouse around the selected
bone until the bone is at a 45 degree angle from where it started.
-
Next, select 'Bone2' in the Skeleton pane. and again left click and rotate the
bone to about a 45 degree angle to the parent bone. Note that if you rotate the
bone more than 180 degrees the animation will interpolate to that position in
the opposite direction, thus in order to make a bone rotate in a specific
direction for an angle larger than 180 degrees you would need to break it down
into multiple steps.
-
In the keyframe editor toolbar click 'Loop' and 'Play' to view the result.

Clicking 'Play' again will stop the animation.
-
Congratulations! You just made your first animation.
Copyright © 2004-2007 Fragmosoft